Presets are used as a higher level control over the attributes. Each preset has a value for every attribute in the setup, but it only affects the attributes of the selected sections. You can even specify to only affect the left or right attributes. This makes it possible to make a joyful expression and add other emotions and/or visimes on just some areas of a face.
The Preset Slider
The slider above the preset list is the Preset Slider. This is the slider that will enable you to mix and morph presets!
The way it works is unlike usual sliders. With a preset (and some sections) selected, you can grab and drag it. This will virtually move the attributes from their current value until they reach their value in the preset when the slider is at 100%. After letting go, the slider jumps back to 0 and can be used again.
This might seem a little weird at first, but you’ll soon get the hang of mixing different emotions on different areas.
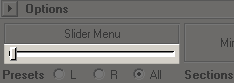
Slider Menu (Right-Click Menu)

Above the slider, you will find a Slider Menu area. There, you can do a right-click to conveniently access often used options for configuring the preset slider.
Note This menu was previously accessible as right-click menu on the preset slider itself. Since on Linux, Maya 2010 and earlier doesn’t support marking menus on sliders, it was moved to this area. |
|
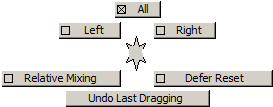
Relative Mixing
This setting specifies whether presets are morphed, so that the preset values are reached if the slider is at 100%, or simply added relatively to the current values. The default is off, so that presets are morphed.
Defer Reset
If checked, the preset slider position is not reset to zero immediately after dragging it. Instead, you can make further tweaks to how much you want the preset to be applied. The slider is reset, however, as soon as you select a different preset or section.
Undo Last Dragging
This is just a convenience function for undoing the last dragging. It exists because you can’t use the “z” key-shortcut for undoing while the animUI has focus.
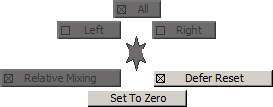
Set To Zero
Sets the slider back into its neutral (zero) position. This is only visible when Defer Reset is activated. It is especially useful in relative mixing mode because the slider’s zero position is then in the center and cannot be reliably reached by dragging.
L, R, or All
With these three check boxes directly above the preset list, you can control which attributes will be affected by the presets. This applies to both, the preset slider and when double-clicking a preset. With L or R selected, only the left or right attributes of the selected sections will be changed. Attributes that are not left or right will not be touched.
The Preset List
The left of the two lists in the upper part of the UI is the preset list. It shows all presets that are available for the The Current Object.
Hint Double-click on a preset to apply it to 100% to the attributes of the selected sections. |
Right-Click Menu
Presets are created and managed using the right-click menu of the preset list.
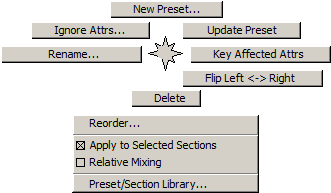
New Preset…
Creates a new preset with the current attribute values. You will be prompted for the name of the new preset.
Ignore Attrs…
Shows a list of all attributes. You can select the attributes you don’t want to be affected by the preset, even if the section they’re contained in is selected. When you press the OK button, all presets that are selected in this moment will be edited to ignore the attributes you’ve selected in the list.
Update Preset
This will replace the data of the selected preset with the current attribute values. To tweak an existing preset, you would apply it completely (select all sections and double-click the preset), tweak the attribute values, and finally choose Update Preset to edit the preset.
Rename…
Renames the selected preset. You will be prompted for a new name.
Key Affected Attrs
Set a keyframe on all attributes that would be affected by the current selection in the preset and section list.
Flip Left <-> Right
Changes the stored values of the selected preset so that left-right attribute pairs are flipped (e.g. changin a left blink to a right blink).
Delete
Deletes the selected presets from the setup.
Reorder…
Shows a window where you can reorder the preset list. In this window, select the presets you want to move up or down in the list and choose Up or Down from the right-click menu. The changes will only take effect when you click the OK button.
Apply to Selected Sections
This check box controls whether presets should be applied to the attributes of the selected sections (default) or to all attributes, regardless of the selection in the section list.
Preset/Section Library…
Opens the Preset/Section Library.