The lower part of the UI contains the attribute sliders. They are grouped in their sections, which can be collapsed and expanded. You can quickly navigate to the sliders of a certain section by double-clicking on it in the section list.
Each attribute has (from left to right) a label, a field, a slider, and a Key button. The button simply sets a key for its attribute.
Attribute Slider Menu (Right-Click Menu)
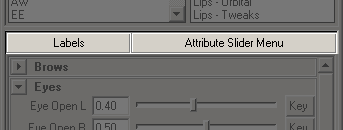
In the Options under Show "Attr Slider Menu", you can specify whether to show an extra row with right-click menus for conveniently configuring labels and sync settings.
The first area, Labels, has a right-click menu with the same functions as the middle-click menu on the slider labels, which is described in 3 Labels for 1 Attribute?.
On the Attribute Slider Menu, you can do a right-click to open a menu with sync settings. In Windows, the sync settings are also available as right-click menu on the sliders themselves.
Note Since on Linux, Maya 2010 and earlier doesn’t support menus on sliders, this area is visible on Linux with these old Maya versions and turned off for newer Maya versions and on Windows by default. |
Syncing
When you right-click on an attribute slider, or on the optionally shown Attribute Slider Menu (see above), a popup menu appears that lets you toggle the real-time sync settings. Here’s the menu:

Sync Top-Bottom
Toggles the real-time top-bottom syncing. If checked and you drag an attribute of a top-bottom pair, the corresponding other attribute will be changed at the same time. You’ll even see the other slider move!
Sync Left-Right
Same as above, but toggles left-right syncing. When both sync modes are activated, you can move four sliders at the same time.
Keep Offset
When you activate this check box, the attributes will keep their current offset (hence the name :P). This means when the left value is 0.5 and the right is 0 and you drag the left to 0.8, the right will not be 0.8 but 0.3.
Advanced Info To use these features, the script needs to know which attributes belong together, of course. In most cases, this is found out automatically based on the attribute names. There are situations in which this doesn’t work. To still be able to use syncing, you can manually define left-right and top-bottom pairs using the Define Symmetry window. |
3 Labels for 1 Attribute?
In the Section Manager, you can enter two alternative names for each attribute. This means you have the actual attribute name and two user definable names. In the animUI, you can choose which of these three names should be displayed. This is useful, e.g., when you want the option to either show an AU’s real name or just the number.
To save screen space, you can control how wide the labels are. This setting is stored for each of the three name types separately. E.g., you can make the Alt1 names wider and the Alt2 names extremely thin.
To quickly adjust which name is shown and how wide the label should be, do a middle-click on an attribute label, or a right-click on the optionally shown Label area above the attribute sliders. The following menu will appear:
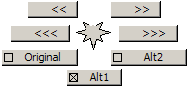
Original
Displays the original attribute names.
Alt1
Shows the Alt1 name you’ve defined for the attributes. This is usually a longer name like the descriptive AU name.
Alt2
Shows the Alt2 name you’ve defined for the attributes. This is usually a short name like the AU number.
<<
Reduces the label width to get more space for the sliders.
>>
Widens the labels, e.g., to see them when their text is too long.
<<<
Reduces the label width in bigger steps.
>>>
Widens the labels in bigger steps.